
What I learned from my 10+ festival booth experiences
Share
It’s well over a year after my first booth experience and since then, I’ve participated in a wide range of art fairs and festivals ranging in cost from free-to-enter to ~$700. I’ve learned a lot of things along the way, especially at this large art festival I had in the summer of 2018, the Bellevue 6th Street Art Festival. I will try to share my experience with you in a way that is organized, though I must say the experiences themselves were always somewhat messy and chaotic :-). But I learned something new every time, especially after talking to other artists who have been in the art festival scene for way longer than I have.
#1 – Decide how much you want to invest
Participating in art fairs can be very expensive, depending on what your target audience is and what type of fairs are available in your vicinity. At a minimum, you will need a 10’x10′ tent and some way to display your art, such as grid walls, propanels, tables with crates on them… etc. You might be able to borrow some of these from a friend the first few times you try small art fairs until you reach a point where you need the professional stuff. To get started with the bare minimum for a professional art festival you’ll need a tent, sand bags to hold it down, 10-15 grid wall panels, a 6 foot table (if you buy 12 or fewer grid walls) with a pretty white or black table cover, a chair and maybe some cute containers for your prints or decorations. The cost of all that, mostly bought from Amazon, would run you around $700-$900. But the good news is that this stuff lasts a long time, so if you do a lot of shows, it works out great. When you want to step up into the big leagues with buying ProPanels, that $800 you spent will seem like peanuts anyway, and you could probably sell the grid walls for a decent amount too so it won’t be a waste.
#2 – Audience, audience, audience
Seriously. Audience! It’s all about the audience of the art fair. Research it. Look for other people who have been to that art fair online and chat with them. If you are in touch with the organizers of the art fair (like after you get accepted), ask them to send your contact info to some people who are repeat artists and ask them about what to expect. Talk to someone who is an artist similar to you in some way (so if your medium is acrylic painting, don’t go talking to someone who weaves pillows! Find another artist who paints).
#3 – Price appropriately for your audience
Not every show audience will match your premium items, so if you’re going to a flea market or Saturday market… etc, make sure you have a lot of items that can be considered an impulse buy – say $35 or less. If you’re spending $800 to get a booth at a big show, then you can bring your large $2000 paintings… etc, but don’t bother carrying it and setting it up for a show where people expect to only spend $20 or so. Have a wide range of prices so that those who like your art work but can’t afford to spend hundreds of dollars can still buy something, like a small print, or a small canvas board original, or even an artist trading card (ACEO).
#4 –Plan your setup thoroughly
Showing up unprepared is the worst thing you can do for yourself. I’ve seen someone spend almost $800 on entering an art fair and then not sell a single piece because they hadn’t prepared their setup. Don’t do that to yourself. If you show up to a show with no grid walls, no tables, chairs, or no way to display your products properly then just don’t bother. It’s better to be prepared – to know exactly what goes where in your display and how people will interact with it best. Think it through thoroughly. A lot of small mistakes can be fixed this way before they even happen. For example, are your prints easier to see if they’re in a box? Maybe you need to bring one of those portfolio displays for your prints? Do you have hooks for the type of hanging you need for your work?
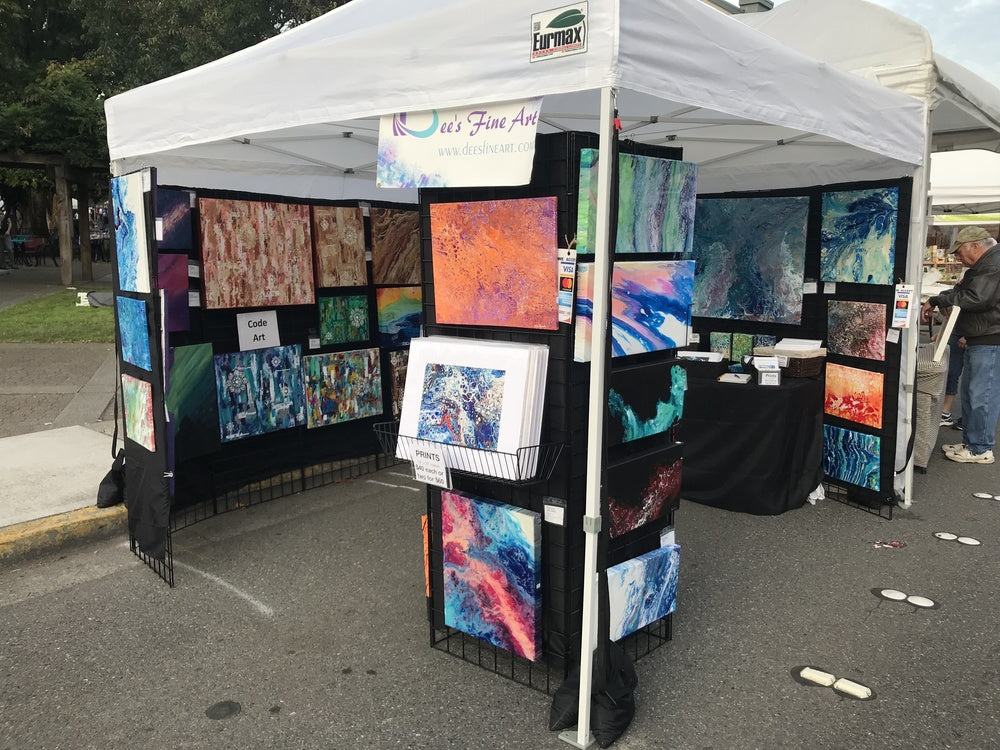
#5 – The art of the display
Okay, so you’ll totally plan your setup thoroughly like I just said… but how *should* you set up, anyway? Well that’s easy. Walk around random art festivals near you and observe what other artists like you are doing! I’ve found it hugely helpful for my own displays to see what works and what doesn’t for other people. So don’t be shy… go check out other artists. Things you might learn, for example: people with grid walls will bend the two at the front of the booth to cover some of the art behind them. They do this to encourage people to walk into their booth to be able to see the art inside. If you don’t, many people will just see all the art from outside and never get close enough to be tempted to buy it! I can’t tell you how many “oh that giant painting is beautiful” people who just walked on by because I hadn’t found a way to get them *into* my booth – where they could have discovered that $10 would buy them a beautiful print of that $1500 painting. Chances of selling something if they don’t enter your booth? Big fat zero.
#6 – Decide whether this art festival thing is for you.
Honestly? It’s not for everybody. It’s tough and it’s taxing physically and emotionally (especially if you are an introvert like me). I’d say try it at least once, and then you can decide for yourself whether it’s worth your time and effort. Like perhaps you do well with online sales, but for some art forms it is very competitive online, and difficult to really showcase the beauty of the work. Or maybe art galleries are the route for you! Just consider this because it really does work great for a lot of people, but it’s okay if you decide you don’t want to do it.
#7 – Location!
If you have an option to choose your location in the art fair, try to do so wisely. Most art fairs will ask you if you have a location preference and try to accommodate you. It helps if you’ve been to that art festival before so you can decide where to place yourself.
#8 – Save yourself some money
Trying to do things right for this big art fair I had, I bought legs for my grid walls. They cost a pretty penny and I ended up not using them a single time. I also bought some of those weird little bolts that hold the grid walls together so as to make a large 10′ wall. Guess what? That was a total waste of money too. I fixed both of those problems with $5 worth of zip ties from Home Depot.
#9 – Bring tools
A drill, some strong scissors, a screwdriver… etc. You never know what you’ll need and having a few tools handy can be the difference between setting up on time and standing there like a fool working on your booth while people walk past it. Same thing for teardown.
#10 – Make your prices crystal clear and professional-looking
A lot of people feel very uncomfortable asking for prices of items. So don’t think to yourself “oh, I won’t put any prices and that’ll get people talking to me, that’s good!” No. Just no. Many of them won’t talk to you, they’ll just walk away without buying anything. And for the prices? Don’t go to all this effort just to skimp on finish. Make your prices look professional, print them out at OfficeMax if you have to. It’s not that hard. There is Avery online software for example where you can design all the tags and then print them at home on their pre-cut cardstock. Things you can include for paintings, for example: What’s the medium? size? price?